테스트 코드 작성하기 - jest, typescript
jest
javascript 테스트 코드를 작성하도록 해주는 프레임워크는 Mocha, Chai, Jest 등이 있는데 간단한 테스트를 만드는데에 좋다고 하는 Jest를 사용해보자.
설치
yarn add --dev jest
npm install --save-dev jest
설정
테스트할 파일이름을 {파일이름}.test.js 로 짓는다.
package.json 에서 실행할 script에 jest로 실행하도록 한다.
{
    ...
    "scripts": {
        "test": "jest"
    },
}
사용
test
jest에서 실질적인 테스트를 진행하게 해주는 함수.
이 메소드가 성공적으로 끝나야 테스트가 완료된다.
test('did not rain', () => {
  expect(inchesOfRain()).toBe(0);
});
expect() 같은 메소드로 테스트 내용을 구성할 수 있다.
test 가 일반적으로 비동기인데 테스트가 끝난 시점을 알아야 다음 테스트로 넘어 갈 수 있다.
끝난 시점을 알 수 있게 하는 여러 방법이 있다.
콜백
함수가 완료되면 callback으로 특정 데이터를 보내주는 fetchData(callback) 라는 함수를 작성했다고 가정해보자.
callback에서 받은 데이터가 peanut butter 인지 테스트하려는 코드를 작성했다.
// Don't do this!
test('the data is peanut butter', () => {
  function callback(data) {
    expect(data).toBe('peanut butter');
  }

  fetchData(callback);
});
이렇게 하면 원하는 결과가 나오지 않는다.
callback 이 불려오기 전에 fetchData() 끝나 버려 테스트가 종료되기 때문이다.
해결법은 test의 인자인 done()을 사용하면 Jest가 done() 을 실행할 때까지 테스트를 끝내지 않는다.
test('the data is peanut butter', done => {
  function callback(data) {
    expect(data).toBe('peanut butter');
    done();
  }

  fetchData(callback);
});
async / await
async / await 을 사용하면 간단하게 해결할 수 있다.
test('the data is peanut butter', async () => {
  expect.assertions(1);
  const data = await fetchData();
  expect(data).toBe('peanut butter');
});

test('the fetch fails with an error', async () => {
  expect.assertions(1);
  try {
    await fetchData();
  } catch (e) {
    expect(e).toMatch('error');
  }
});
Common Matchers
가장 기본적인 Matcher
- value check
test('two plus two is four', () => {
  expect(2 + 2).toBe(4);
});
- object check
test('object assignment', () => {
  const data = {one: 1};
  data['two'] = 2;
  expect(data).toEqual({one: 1, two: 2});
});
- not check
test('adding positive numbers is not zero', () => {
  for (let a = 1; a < 10; a++) {
    for (let b = 1; b < 10; b++) {
      expect(a + b).not.toBe(0);
    }
  }
});
Truthiness
undefined, null, and boolean값을 검사하고 싶을 때 사용
toBeNull:null인지 체크toBeUndefined:undefined인지 체크toBeDefined:undefined가 아닌지 체크toBeTruthy: true 인지 체크toBeFalsy: false 인지 체크
test('null', () => {
  const n = null;
  expect(n).toBeNull();
  expect(n).toBeDefined();
  expect(n).not.toBeUndefined();
  expect(n).not.toBeTruthy();
  expect(n).toBeFalsy();
});

test('zero', () => {
  const z = 0;
  expect(z).not.toBeNull();
  expect(z).toBeDefined();
  expect(z).not.toBeUndefined();
  expect(z).not.toBeTruthy();
  expect(z).toBeFalsy();
});
describe
describe 를 사용해 test를 그룹화 할 수 있다.
describe('matching cities to foods', () => {
  test('Vienna <3 sausage', () => {
    expect(isValidCityFoodPair('Vienna', 'Wiener Schnitzel')).toBe(true);
  });

  test('San Juan <3 plantains', () => {
    expect(isValidCityFoodPair('San Juan', 'Mofongo')).toBe(true);
  });
});
Typescript에서 express 테스트
설정
프로젝트 루트에 npm init을 한다.
npm init -y
typescript와 jest 뿐만 아니라,
jest에서 typescript를 실행하기 위한 ts-jest와 간단하게 요청을 테스트할 수 있는 supertest 모듈, jest의 type 모듈을 설치한다.
npm install --save-dev ts-jest supertest @types/jest jest typescript
express를 설치한다.
npm install --save express @types/express
테스트할 파일이름을 {파일이름}.test.js 나 {파일이름}.test.ts 로 짓는다.
typescript에서는 jest 설정들이 더 필요하다.
package.json 에서 jest 설정 정보를 넣는다.
{
    "jest": {
        "transform": {
            "^.+\\.ts$": "ts-jest"
        },
        "testRegex": "\\.test\\.ts$",
        "moduleFileExtensions": [
            "ts",
            "tsx",
            "js",
            "json"
        ],
        "globals": {
            "ts-jest": {
                "diagnostics": true
            }
        }
    },
}
실행할 script도 넣는다.
{
    ...
    "scripts": {
        "test": "jest --detectOpenHandles --forceExit"
    },
}
express는 listen하면 이벤트가 계속 열려있어 종료되지 않는 문제가 생긴다.
그래서 —detectOpenHandles 로 열려있는 리소스를 모두 닫아주고, —forceExit로 테스트가 끝나면 강제 종료를 해주는 옵션을 추가한다.
코드
- app.ts
import * as express from 'express'

class App {

  public app:express.Application;
  public port:number;

  constructor() {
    this.app = express();
    this.port = 8989;
    this.testUrl();
    this.listen();
  }

  public testUrl() {
    this.app.get('/', (req, res) => {
      res.sendStatus(200);
    });
  };

  public listen() {
    this.app.listen(this.port, () => {
      console.log(`App listening on the port ${this.port}`);
    });
  }
}

export default new App();
간단한 express App을 작성한다. 여기서 / url이 잘 요청되고 200응답이 오는지를 테스트할 예정이다.
- app.test.ts
import * as request from 'supertest'
import App from './app'

describe('Test the root path', () => {
  test('It should response the GET method', async (done) => {
    const response = await request(App.app).get('/');
    expect(response.statusCode).toBe(200);
    done();
  });
});
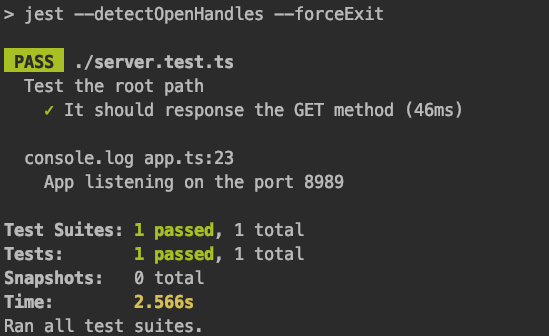
실행
npm test
결과

참조
https://jestjs.io/docs/en/getting-started
http://www.albertgao.xyz/2017/05/24/how-to-test-expressjs-with-jest-and-supertest/
