iBeacon 만들고 비콘 인식 앱 제작
개요
HM-10 모듈은 ibeacon이 지원되기 때문에 간단한 AT 명령어로 ibeacon을 만들 수 있다. 그 후 비콘을 인식시키는 안드로이드 앱을 제작해 활용성을 높일 수 있다.
준비물
- HM-10 (BLE 모듈)
- 아두이노 UNO
- USB 케이블
- 점프 와이어 4개
- 안드로이드 핸드폰
HM-10로 iBeacon 만들기
HM-10을 iBeacon을 만드려면 아두이노를 이용해 AT-command로 설정해주어야 한다.
회로도
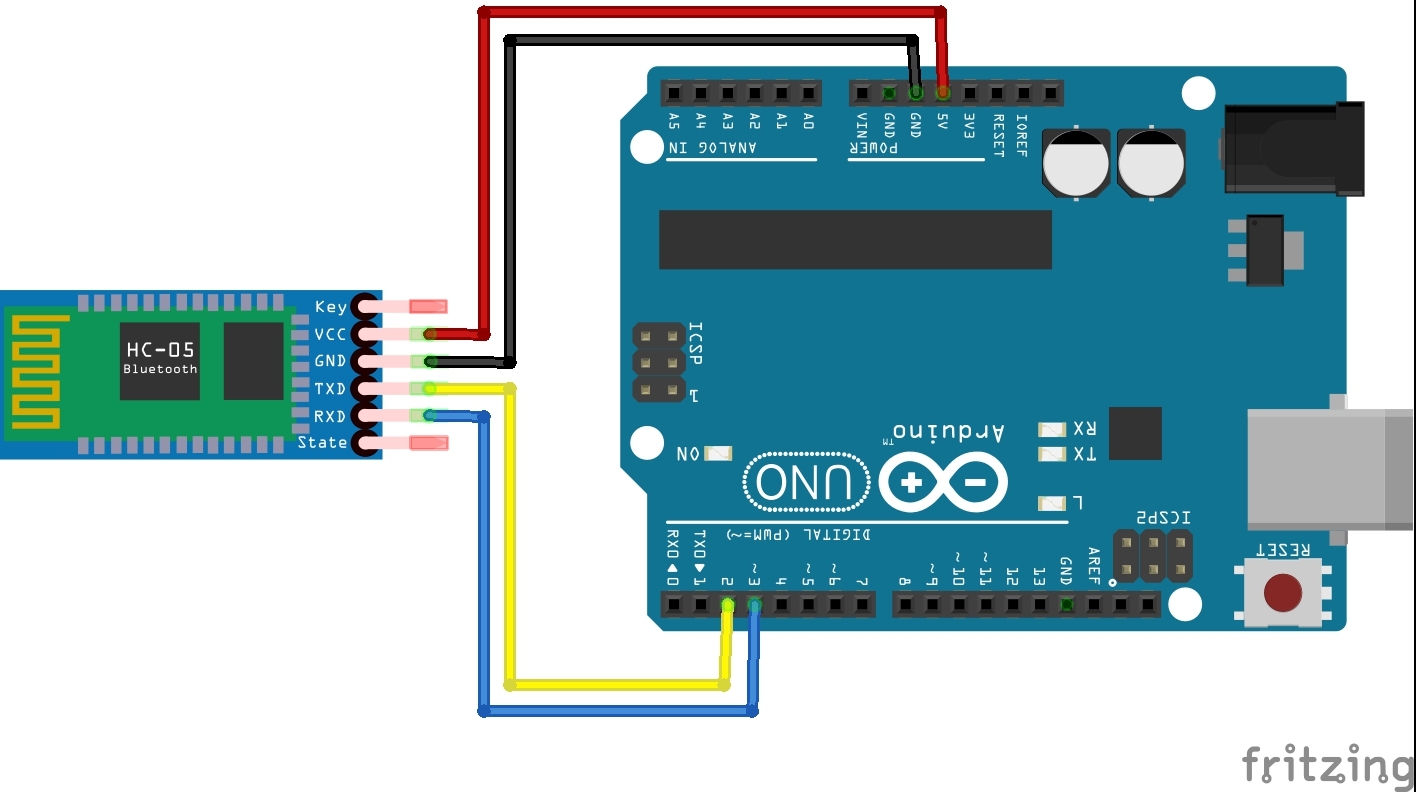
Tx와 Rx가 교차되어 연결하는 것이 중요하다. 이렇게 연결 후 PC와 연결한다.
아두이노 코드
#include <SoftwareSerial.h>

SoftwareSerial hm10(2,3); //RX, TX 연결

void setup() {
  // put your setup code here, to run once:
  Serial.begin(9600);
  hm10.begin(9600);
}

void loop() {
  // put your main code here, to run repeatedly:
  while(hm10.available()){
    byte data=hm10.read();
    Serial.write(data);
  }
  while(Serial.available()){

    byte data=Serial.read();
    hm10.write(data);
  }
}
코드를 아두이노에 업로드 후 시리얼 모니터를 켠다.
iBeacon 설정
이제 시리얼 모니터에 AT 명령을 보내 iBeacon을 만들 수 있다.
AT+RENEW //공장 초기화
AT //OK 사인이 오는지 확인
AT+MARJ0x1234 //iBeacon의 Major Number 설정
AT+MINO0xFA01 //iBeacon의 Minor Number설정
AT+ADVI5 //신호 송출 주기를 5로 설정
AT+NAMEBLETEST// BLE모듈 이름을 BLETEST으로 설정(원하는 이름으로 하세요)
AT+ADTY3 //non-connectable 상태로 만듦
AT+IBEA1 //iBeacon 활성화
AT+DELO2 // iBeacon 브로드캐스트 전용 모드로 설정
AT+PWRM0 //최소 절전 모드 설정
AT+RESET //Rebutting
모든 명령에 응답이 와야한다. 완료 되면 모듈이 저전력 모드가 되어 깜박이던 빨간불이 들어오지 않게 된다.
iBeacon 확인
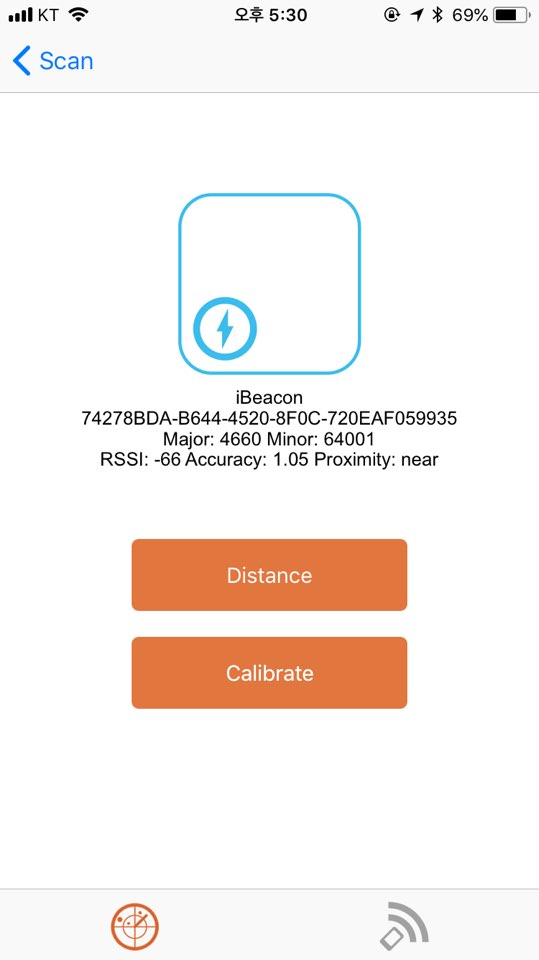
잘 설정되어 iBeacon이 되었는지 간단하게 앱으로 확인해본다.
Locate 라는 앱을 사용했다.
간단한 앱 제작
안드로이드 스튜디오에서 altbeacon 라이브러리를 사용해 앱을 제작할 수 있다.
라이브러리 가져오기
altbeacon 공식 사이트에서는
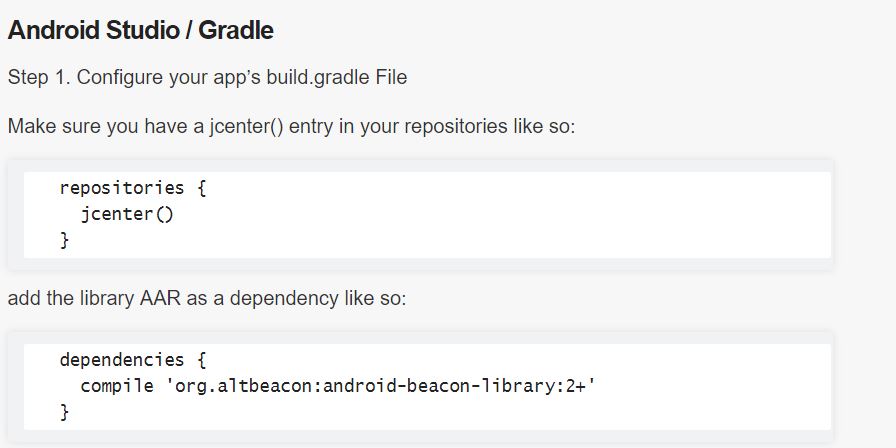
이렇게 안내하고 있다.
IDE 기능을 이용할 수도 있다.
먼저 프로젝트 생성 후,
File -> Project Structure
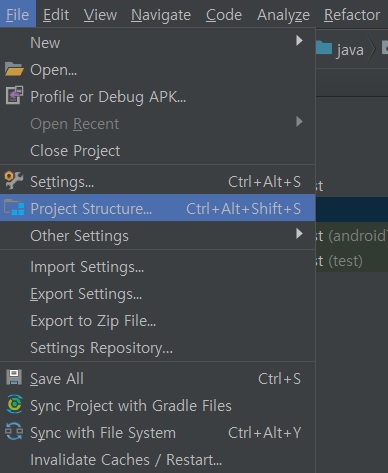
app -> 상단 Dependecies -> + -> Library Dependency 로 들어가 altbeacon을 치고 검색하면 라이브러리가 나온다.
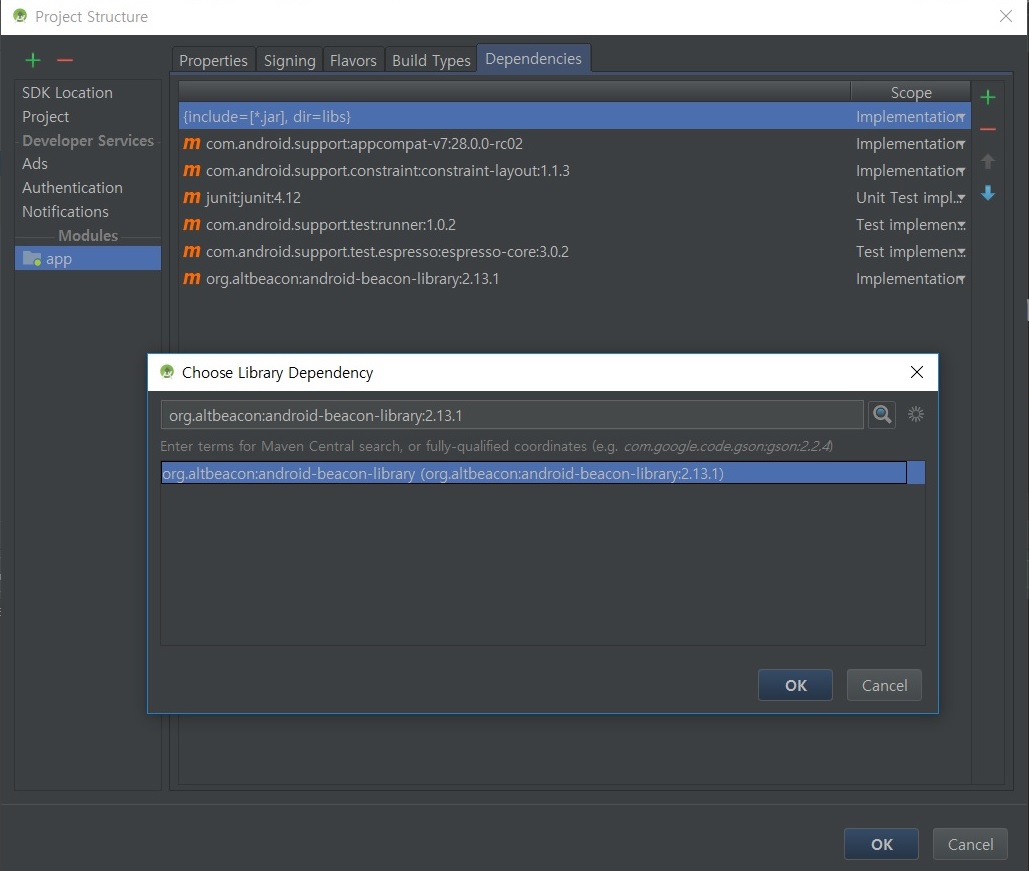
선택 후 OK를 누르면 자동으로 라이브러리가 추가된다.
권한 추가
비컨을 제어하기 위해서 manifests 파일에 권한을 추가해준다.
<uses-permission android:name="android.permission.BLUETOOTH"/>
<uses-permission android:name="android.permission.BLUETOOTH_ADMIN"/>
<uses-permission android:name="android.permission.ACCESS_COARSE_LOCATION"/>
MainActivity.java 코드
public class MainActivity extends AppCompatActivity implements BeaconConsumer{
    protected static final String TAG = "MonitoringActivity";
    private BeaconManager beaconManager;

    @Override
    protected void onCreate(Bundle savedInstanceState) {
        super.onCreate(savedInstanceState);
        setContentView(R.layout.activity_main);

        beaconManager = BeaconManager.getInstanceForApplication(this);

        // ibeacon layout
        beaconManager.getBeaconParsers().add(new BeaconParser().
                setBeaconLayout("m:2-3=0215,i:4-19,i:20-21,i:22-23,p:24-24"));
        beaconManager.bind(this);
    }

    @Override
    protected void onDestroy() {
        super.onDestroy();
        beaconManager.unbind(this);
    }

    @Override
    public void onBeaconServiceConnect() {
        beaconManager.addMonitorNotifier(new MonitorNotifier() {
            @Override
            public void didEnterRegion(Region region) {
                Log.i(TAG, "I just saw an beacon for the first time!");
            }

            @Override
            public void didExitRegion(Region region) {
                Log.i(TAG, "I no longer see an beacon");
            }

            @Override
            public void didDetermineStateForRegion(int state, Region region) {
                Log.i(TAG, "I have just switched from seeing/not seeing beacons: "+state);
            }
        });

        try {
            beaconManager.startMonitoringBeaconsInRegion(new Region("myMonitoringUniqueId", null, null, null));
        } catch (RemoteException ignored) {    }
    }
}
주의할 점
-
startMonitoringBeaconsInRegion(Region region)는 해당 지역(범위)의 비콘들을 탐지한다. 파라미터의 Region 객체로 지역(범위)를 지정할 수 있다. -
Region(java.lang.String uniqueId, Identifier id1, Identifier id2, Identifier id3)의
첫번째 인자는 이 Region 객체의 고유 ID를 String값으로 지정할 수 있다.
그 뒤에 인자들은 UUID, Major, Minor 값으로 자세한 범위를 지정할 수 있다.
모두 null을 넣으면 모든 비콘을 찾는다.
-
- setBeaconLayout을 ibeacon 레이아웃으로 잘 설정해주어야한다.
beaconManager.getBeaconParsers().add(new BeaconParser().
              setBeaconLayout("m:2-3=0215,i:4-19,i:20-21,i:22-23,p:24-24"));
setBeaconLayout의 파라미터에는 레이아웃 설정을 위한 특정 코드가 들어가는데 각 옵션의 의미는
https://stackoverflow.com/questions/33594197/altbeacon-setbeaconlayout
에 나와있다. ibeacon은 위의 코드를 사용하면 인식할 수 있다.
* 참조
http://www.makewith.co/page/project/1004/story/2392/
https://stackoverflow.com/questions/33594197/altbeacon-setbeaconlayout
https://altbeacon.github.io/android-beacon-library/index.html
